In this issue we will tell you how to make a barbell, dumbbells and weight plates at home with your own hands.
To begin with, let's say that homemade simulators are very similar in appearance to factory production models. First, we need a barbell (or an analogue of a barbell). Let's start making a barbell with the bar. It all depends on how much weight you are going to lift, and therefore the different requirements for the bar. I think you have already guessed that the more weight you are going to lift, the more strength the bar should have, but the strength should be good even if you lift a 50 kg barbell, i.e. relatively light weights.
The barbell can be made:
From a multifaceted section or an all-metal rod. Most often, such rods are sold at construction markets or in metal shops. The diameter of the rod should be about 25-35 mm, and the length should be approximately 2 meters. On each section 30 cm from each end, you can screw a washer or a piece of pipe 15-20 mm long, the internal diameter should be slightly larger than that of the rod. The washer or pipe must be attached by welding or connected with a rivet to a rod. This is all necessary in order to fix the burden in the future.
It can also be made from a pipe with a diameter of 30-40 mm, and the wall thickness should be at least 5 mm. This bar is not suitable for heavy weights. On each side of the pipe, you can tightly drive a round rod of the required diameter inside, and then secure it with rivets, after which you can hang the disks.
The neck can even be made from wooden materials, but of course it will be too thick and not strong enough (although it will be suitable for small scales). To make a fingerboard from wood you need to take hard rocks trees, for example you can take birch. The diameter of such a neck should be about 40mm. Such a bar will support no more than 50 kg.Making pancakes for our barbell at home
 Of course, it is best to order pancakes at the factory. Even though it will cost a lot of money. But you can also make them yourself from steel or concrete. This is even easier than with a neck: first you need to calculate the size and diameter of the mounting hole. You also need to do the edging required sizes made of wood or plywood. After you have made the edging, you need to pour the solution itself inside (we make the solution from cement and sand), but do not forget to reinforce the disk with a wire mesh cut in the shape of a circle. One such pancake should dry for about three days. It is advisable to pour water on it after drying and let it dry for several days, so it becomes even stronger. Pancakes made from concrete are much smaller than those made from steel (or cast iron).
And as a result, we can get good sports equipment, no worse than factory equipment.
Best regards, administrator.
The bench press can be used to develop the pectoral muscles as well as other accessory muscles. This is one of the most common and effective exercises.
The article offers a drawing and a guide that will help you do everything you need to do this exercise at home. This option is relatively cheap and simple, but at the same time very reliable. In addition, it will look high quality.
In addition to how to make a barbell at home, this article will also describe how to make a bench press. After all, in order to perform this important exercise, both are necessary. To begin with, it is advisable to read at least the introduction of the article “”, as this will help you learn the main nuances and difficulties homemade sports equipment, incl. and where you can get the material.
It should be understood that the specifics in the question of how to make a barbell with your own hands or how to make a rack for a barbell are not very important. The main thing is to understand the essence, dimensions, proportions and approximate appearance. The Internet is full of drawings for making a bench press bench and the barbell itself in the same form as it is sold in the store. But if you need to do it yourself, or just do a small home gym, then such a complex and expensive option is not necessary. Here is a durable, effective and easy-to-manufacture option. This is what you should get (Fig. 1):
Rice. 1. DIY barbell and bench press
Of course, it is not the most elementary, because you can also find how to make a barbell from wheels, bottles, or one where instead of pancakes there is a poured concrete mold. But if you want to exercise seriously, then it is better to make a barbell at home and a bench for the bench press so that it is normal, and not such that you will not even be in the mood to exercise over time.
In order to make a barbell at home and make a bench for bench press, the main thing you need is:
- standard steel pipes(preferably square);
- tools that most people have at home (a grinder or a hacksaw, an electric drill or even a hand drill, a screwdriver, screws);
- knowledge of the basics of metal cutting;
- knowledge of basic welding or a familiar welder.
As for knowing the basics of welding, you can do without it if you fasten everything with screws or cheat something and simplify it (I’ll give an example of how later).
Now let’s take a more specific look at how to make a barbell at home and a bench for it for bench press. Let's start with the bench.
In the notation (Fig. 2), the upper number means the serial number of the part in the table, and the lower number means the number of exactly the same parts.
Rice. 2. Homemade bench for bench press.
Materials needed to make a bench press:
1. Square pipe 50x50x4. That is, the sides are 50 mm and the metal thickness is 4 mm. We need approximately 8.2 m, this is already with a small margin (8 cm). If everything is done carefully and exactly according to the drawing, then it should be enough almost right next to each other. The price of such a pipe is about 5-6 USD. per meter That is, you will have to spend approximately 45 USD on it. You can replace it wooden blocks, if you do not plan to train with very heavy weights. This will help save money, but increases the risk of injury if the tree fails. It is worth choosing strong wood species.
2. Wooden sheet or just a board measuring approximately 1.3 x 0.3 m. It is necessary to lie on while performing the exercise. You can upholster it with dermantine or leatherette, placing a layer of foam rubber or some fabric folded several times underneath. But it shouldn't be too soft.
3. Holders, as in drawing (10), which can be made from a strip of steel. Or simply arches in the form of stags in the form of the letter “U” or “Y”, which will be easier. These stags can be made from reinforcing rod. The main thing is that the bar lies securely in them. You need 2 of them.
4. Lids or, so to speak, plugs - small metal plates measuring 50x50 mm (thickness is not important). You can do without them, they are only for aesthetics. But there is (11) on the diagram. If you decide to use them, you will need 6 pieces.
5. Fastenings, as shown in the figure (Fig. 2), welded from rectangular and triangular plates. This is practically the only place where welding is necessary if you do them as in the picture. But you can do without this. Instead, you need to take 3 metal or wooden plates measuring approximately 90x40 mm. Or it is possible in other sizes, the main thing is that the pipes to which the board is attached protrude a couple of centimeters on both sides. We fasten these plates with screws to this pipe, drill holes in them and screw the board on top. What is meant is shown in the figure below (Fig. 3).
 Rice. 3. Simplification of attaching the board to the bench frame.
 6. Screws, nuts and spring washers (grovers) 12 pcs. each to keep the homemade bench press bench in the pile.
All these parts are shown in the figure above (Fig. 2).
Now it’s time to make a homemade barbell.
Rice. 4. DIY barbell.
Materials needed to make a barbell at home:
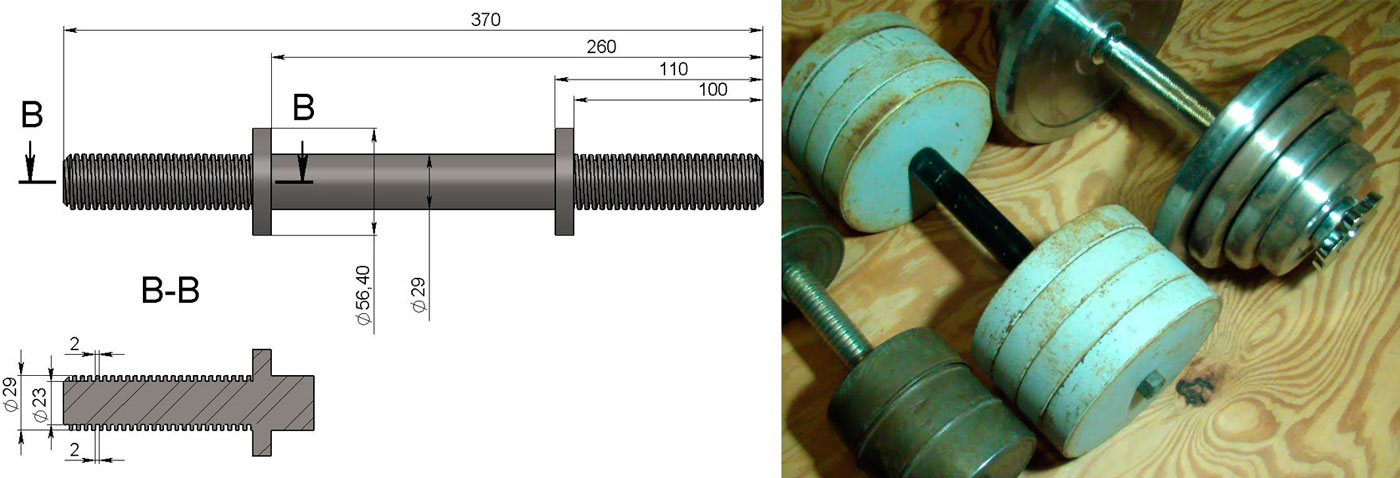
1. Round pipe with a diameter of 32 mm, with a metal thickness of at least 6 mm, a length of 1.6 - 1.8 m. A standard steel bar is 2.2 m long and weighs 20 kg. With the help of improvised materials, that is, round pipe, unfortunately, it will not be possible to achieve such weight and strength as his. The maximum that can be found is a metal thickness of 8 mm. But even with this thickness, the weight and strength will not reach those of a standard bar. With a steel thickness of 6 mm (the most common pipes), the weight will be about 7 kg if its length is 1.8 m. Why you should not take a pipe length for the bar more than 1.8 m to make a barbell at home, I think it’s clear . After all, as already mentioned, its strength is less and its weight is the same as a standard bar will not withstand. It is better to take a pipe, of course, with as much metal thickness as possible, but this will not add much weight, although a homemade rod will be stronger. Look at the price and the ability to get it. Round steel (“pipe without a hole”) is an expensive option, although it is more effective and reliable, because the main disadvantage of the pipe is that it will not withstand a lot of weight, unlike it. But, for example, a crowbar found in the yard is unlikely to be suitable due to its insufficient length. To make a homemade rod, you will need to cut a 20 cm thread on the edges of the pipe on each side.
2. The so-called separators, that is, 2 obstacles for the pancakes so that they do not cross the territory allocated for them. These delimiters can be implemented in different ways. The most reliable way, of course, is to weld on the pipe in in the right places pieces of steel. But you can do without welding, for example, make small holes and carefully wind wire or electrical tape in the right places. If appearance is not very important, then just drill 2 through holes in the pipe and insert the screws there, screw the nuts on them, and the pancakes will not jump over such an obstacle. The distance from the edge of the neck (pipe) to the separator should be 20 cm.
3. Pancakes. The picture shows pancakes that have a total mass of 51 kg. But, when doing a barbell at home, it will be difficult to guess with the weight. And also the weight of 51 kg of pancakes + 7 kg of the bar will be too small for a homemade barbell. If not now, then soon. But it is important not to overdo it so that the pipe can withstand it. Also, the pancakes are the most expensive part needed. The recommended steel thickness for them is 3 cm. You can buy such a sheet, but not cheaply, or you can look for suitable pancakes or their substitutes in the yard or scrap metal collection points. The main thing is symmetry in weight. That is, so that a load of 25 kg does not hang on one end of a homemade barbell, and 30 on the other.
4. Nuts for fixing pancakes. Two nuts suitable for the selected pipe. If the pipe is 32 mm, then the nut is 32 mm, respectively. The second option is to drill several through holes with a small distance between them, and insert screws into them - into those holes that are as close as possible to the inserted pancakes. The third option (the most aesthetic and simplest) would be to buy 2 special spring clamps for the neck. They are not very expensive, but it will be very practical.
Everything is shown put together in the picture above (Figure 4).
Not everyone who wants to play sports has enough time to visit the gym, and home workouts require certain equipment, the cost of which is quite high. The most popular are dumbbells. They are involved in almost all exercises. And if you don’t plan to purchase sports equipment in the near future, you shouldn’t give up exercising. You can make dumbbells with your own hands from fairly cheap materials. To do this, just read the instructions on how and what they are made from.
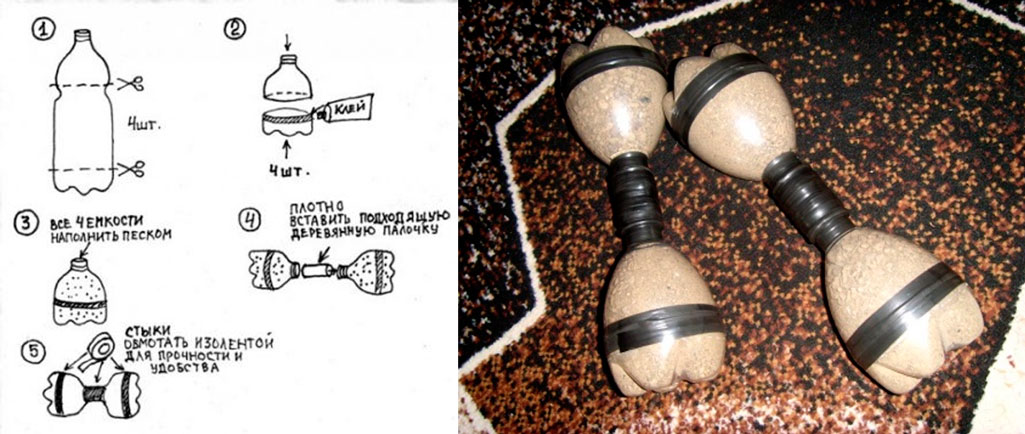
Conventional plastic bottles allow you to short term make dumbbells that you can use right away. The main thing is to secure the structural elements well so that it does not collapse during training.
To assemble one plastic projectile you will need: 2 bottles, adhesive tape or insulating tape, filler.
Step-by-step instructions for making dumbbells from plastic bottles:
- Cut out the middle part of the bottles. The separated elements (upper and lower) are fastened with adhesive insulating tape.
- Filler is poured into the container. If the projectile is made of light weight, cement and sand are used. Dumbbells with greater mass require the addition of metal inclusions, which can be balls from bearings, nails, or various metals. The choice depends entirely on the availability of a particular material.
- When the necks of the bottles are filled, insert a pipe or stick made of metal or wood. Wrap the joints with electrical tape or tape. Thanks to this manipulation, you will get a non-slip, soft and quite comfortable handle.
Before starting classes, you should carefully check all connections so that the filler does not “leak through.”

Regular plastic bottles are suitable not only for collecting dumbbells, but also barbells. This projectile weighs much more, so the amount of starting material increases.
To assemble the bar you will need: at least 8 plastic bottles, a bar, filler material, electrical tape or tape.
Instructions for making a plastic rod:
- Bottles are filled in the same way as dumbbells.
- Select the material for the fingerboard. It is better to take fittings or pipes that fit comfortably in your hand.
- At each end of the bar, ready-made weights from filled plastic bottles are placed and wrapped with adhesive tape. There are four weights on each side.
- Check the quality of fastening. The neck should not move or form any play. If the connection is weak, add more electrical tape.
- The weight of the bar can be increased by placing additional weights in the form of bars between bottle weights and so on.
- Each additional load must be wrapped with a new layer of electrical tape. The load can be increased up to 100 kg.
It is quite difficult to navigate the choice of material. The approximate weight of a dumbbell or barbell can be calculated based on the data presented:
Weight of a two-liter plastic bottle with various fillers:
- water - 1.997;
- compacted sand - 3,360;
- wet sand - 3,840;
- crushed stone (peastone) - 2,600;
- lead - 22,800.
Weight is given in kilograms.
We collect shells from concrete

The cement base allows you to get heavier dumbbells and barbells than using plastic bottles. The pancakes are not only more impressive in weight, but also look much more solid. They are cast from cement mortar V special form, inside of which there is a neck. The disadvantage of this design is that the load of the projectile cannot be adjusted or adjusted to suit someone else.
To start working with a different weight, you will need to make a new barbell or dumbbells. Weighting agents, in fact, are individual, and also quite fragile and “free-flowing”. The last drawback is eliminated by introducing PVA glue into the solution. And if the classes are not conducted according to the principle of powerlifting, when the apparatus is thrown onto the floor, then it will last quite a long time.
To make concrete dumbbells (barbells) you will need: metal pipe with the required length, bolts or screws, cement mortar, PVA, as well as a mold for casting the load.
Step-by-step instructions for making cement projectiles:
- At the ends of the pipe, holes are made in four directions using a drill. Screws are screwed into the holes made so that they are fixed as securely as possible at the ends and form a peculiar cross shape. They become the framework that holds the cement.
- The pancake pan is made from a flat mayonnaise or paint bucket. You can use another container. The main thing is that the weight be selected so that it is necessary for training and suits the body of the student. Glue is added to the solution for hardness or oil paint is introduced.
- Place a pipe in the poured mixture and wait about four days until it completely sets. Repeat the manipulations described in the previous paragraphs for the second side. Make a support. The structure is tied up or suspended for another four days.
- When the cement has completely set, over the next week the projectile is soaked at least twice in water so that it gains even greater strength.
Shells poured into a two-liter mold can weigh about 5 kg. The exact weight is determined by the composition of the mixture involved.
To do the Farmer's Walk, you don't need to make any apparatus. It is enough to take two ordinary cans and hang them on a stick. You can use tires filled with sand or any other filler. It is difficult to perform other exercises with a similar design. They require the use of full dumbbells.
When sports activities become regular, the need arises to purchase more professional equipment or make them from metal. They are practically no different from the factory ones. The difference is that homemade dumbbells are much cheaper. From one pipe you can simultaneously make both a bar and plates. It is best to make stacked dumbbells from metal.
To make projectiles, you need to prepare in advance: a thin-walled pipe with a diameter slightly larger than that of the bar, for which it is better to take a metal rod, locking locks and sheet steel. Work on the manufacture of dumbbells should be carried out in a locksmith workshop.
Step by step instructions:
- Approximately 35-40 cm of the neck is sawed off from scrap metal with a diameter of about 3 cm. To make the projectile comfortable to hold in your hands, about 15 cm is cut from the thin-walled pipe. The resulting piece is put on the bar. Further, if desired, it can be covered with relief or wrapped with electrical tape.
- Pancakes are cut using an autogenous machine from sheet steel. The weight of one disk with a diameter of 18 cm and a thickness of 1 cm is 2 kg. This makes it easy to calculate the required number of pancakes to get a mass of 10, 20, 30, 40 kg. The dimensions of the discs also make it quite easy to change the weight of the weights from small to maximum. Cutting a whole set of pancakes allows you to constantly work with different weights.
- The next step is the locking locks. The diameter of the pipe is larger than that of the neck. Rings with a width of 3 cm are cut from the product. They should move freely along the bar, but not slip off. One hole with a diameter of at least 1-1.20 cm is drilled into the rings. They are necessary for screwing in screws, which allows the rings to hold the plates and press against the bar. The main thing is to take care of the high-quality pressing of the screw so that there are no backlashes.
- On last stage start assembling the dumbbells. Weights are hung on the bar with a piece of pipe in the middle and secured with locking locks.
Dumbbells made using the described method are not inferior in quality to factory ones and allow you to work with both light and heavy weights.
General tips and tricks for assembling dumbbells at home

The best without any doubt are metal shells, but they are much more difficult to manufacture than other designs. It is necessary not only to make the disks, but to choose the correct width of the pancakes, and to make the locking locks in a quality manner according to the calculations. It is recommended to increase not the width, but the diameter of the disks. You can make several heavy and several small pancakes.
To make the dumbbells look presentable, the parts are sanded and painted. This will only slightly complicate the creation process and increase the cost of the shells, but they will look no worse than factory ones and have a much lower price. Exercises with such equipment will bring more pleasure, and, consequently, motivation and the effect of training will increase.
You should not waste time and effort on creating dumbbells weighing up to 100 kg. There are plenty of instructions for assembling such structures on the Internet, but it is better to immediately make a barbell with a capacity of 200-300 kilos in order to perform deadlifts. Dumbbells are not suitable for such loads. And if you lift iron, then with a serious apparatus, that is, a barbell.
If such an opportunity exists, you can purchase a bar with a handle in a store, and either make the pancakes yourself or order them from a workshop. A high-quality handle promotes comfortable exercise, and homemade pancakes significantly reduce the overall cost of the projectile.
Bench press– a productive and most common exercise that develops the chest muscles. For home use Not everyone can afford to buy a trainer in a specialized store. Then try making it yourself. Who doesn’t know how to make a homemade barbell. You can use the tips given in the article. It turns out that this is not as difficult as it seems at first glance. In addition, in terms of finances, making a homemade barbell is much more profitable. There is no need to purchase expensive equipment to practice at home.
Outwardly reliable homemade design will look aesthetically pleasing. In addition to tips on how to make a homemade barbell, you will find answers to making a DIY bench press, which is necessary for performing the exercises of this strength training.
The appearance of the future simulator is as in the figure below:

Note that this option is not the simplest. You can make a homemade barbell from bottles, wheels, or concrete pancakes. But, for regular exercise, it is better to try once, making a homemade barbell that looks attractive, so it will be a pleasure to exercise with it.
How to make a homemade exercise machine for training at home
Materials that will be needed to assemble the simulator: standard steel pipes (preferably square).
Tools. You can find them at home, and buy the missing ones in the store: an electric drill (but a hand drill will do), a hacksaw or grinder, screws and a screwdriver.
Of course, to make a homemade simulator, you need basic knowledge of metal cutting and welding basics(at least, help from friends).
In principle, you can do without welding if you replace it with fastening using screws.
You can’t train without a bench press, so let’s start with making one.
Making a bench press
The figure below shows the designations: The top number in the circle indicates the part number, the bottom tells you which part to attach it to.

Materials for assembling the bench:
- Square pipe 50x50x4: 50 millimeters is the size of the sides, 4 is the wall thickness. You need to buy it with a reserve of 8.2 meters. This amount should be enough, provided that everything is done carefully and strictly according to the drawing. The cost of a meter of pipe is 5-6 dollars, and total amount will be about 45 dollars. If you are planning classes with light weights, you can save money by replacing it with bars made of strong wood.
- Board size 1.3x0.3 meters, on which they lie when performing the exercise. For convenience and beauty, it is upholstered with leatherette, leatherette or thick fabric, under which foam rubber is placed. But don't make the bench too soft.
- Holders (10) – 2 pieces. They are made from steel strip. Arcs of the “Y” or “U” type are suitable. Stags are also made from reinforcing rods. The main thing is that they hold the barbell securely.
- Plugs(11)– metal plates 50x50 millimeters (any thickness). But you can do without them, since the covers serve a purely aesthetic function. If you use them, you need 6 pieces.
- Fastening(see picture). These are parts welded from triangular and rectangular plates. You can't make them without welding. But this is the only place where it cannot be replaced if you follow the recommendations. You can do without this if you use 3 plates of wood or metal measuring 90x40 mm (or other). The main thing is that they protrude a couple of centimeters on both sides of the pipe to which the board is attached. The plates are attached to the pipe with screws: holes are drilled into them and a board is screwed on top.
- Grovers(spring washers), nuts, screws - 12 pieces each. They are needed to hold the bench together.

After the bench press is assembled, it’s time for the homemade barbell
How to make a barbell

Materials:
- Pipe with a diameter of 32 millimeters and a wall thickness of at least 6 millimeters. You need 1.6-1.8 meters. The steel magazine bar weighs 20 kg and is 2.2 meters long. Such characteristics (weight and strength) are not provided by available materials. Even if you take out a pipe with a metal thickness of 8 mm, you cannot reach the specified parameters of a standard neck. Considering that the most common are pipes with a wall of 6 mm, it is possible to achieve a weight of 7 kg by taking a length of 1.8 m. (Why is it not recommended to have a longer length to make a homemade rod? Because of its low strength, it simply will not withstand such a weight , like a factory bar. A homemade bar will be stronger if you take a larger thickness of metal, but even this will not add significant weight. Here, you need to take this into account, and focus on the cost - a steel round bar, of course, is more reliable and efficient. a thread is cut at the ends of the selected pipe - 20 centimeters on each side.)
- Pancake dividers are needed so that they do not cross the “line” allotted to them. A simple and reliable option that prevents pancakes from doing this would be to weld pieces of steel in the right places. If there is no welding, use electrical tape or wire, which is wound in the right places, after making holes in them. If appearance is not so important to you, drill two through holes in those places and insert screws and nuts into them. The distance to the separator is 20 cm.
- Pancakes added to total weight 51 kg. But when making a homemade barbell, it is difficult to determine the exact weight. In addition, remembering that the weight of the bar is 7 kg, plus 51 kg (what the barbell weighs), it will not be enough. You also can’t overdo it, given the strength of the homemade rod pipe. For pancakes, the recommended steel thickness is 3 cm. You won’t be able to buy such a sheet cheaply. You can look for them at scrap metal collection points, keeping in mind that symmetry is necessary, i.e. so that the number of kilograms at both ends is the same.
- To fix the pancakes you need 2 nuts: for a diameter of 32 - a nut for 32, respectively. The next option is to drill through holes at a short distance, insert screws into those of them that are closer to the pancakes. Another aesthetic way is special spring clips (2 pcs.). They are practical and inexpensive.
When everything is prepared, they begin assembly and are proud of themselves. There are downsides to a homemade barbell, and it’s a bit expensive. However, it is much more economical than buying it in a store, and it brings just as many benefits. Having made a homemade barbell, you get powerful motivation: after spending so much effort, you cannot stop training.
Video: How to make a barbell with your own hands
Sports can be done at home. To achieve an athletic, toned body, it is enough to exercise with your own weight. But to make great progress, you should use additional weights.
Many people do not have the opportunity to purchase expensive sports equipment, but do not despair: you can make dumbbells and barbells with your own hands at home, having a minimal set of tools and available materials.
How can you replace dumbbells at home?
If you don't want to make dumbbells yourself or don't have necessary tools, for training you can use heavy things that are at hand.
The most common items that usually replace dumbbells are ordinary plastic bottles or bricks. The latter can be used immediately without additional modifications. A standard red brick weighs about 3.5 kg.

Bottles should only be used as a weighting agent with filler: water, crushed stone or sand. The weight of the equipment directly depends on the type of filler. 1 liter of water weighs approximately 1 kg. This is a small mass, so if you are using water, it is better to take a 2 liter bottle. By filling it with crushed stone, you can get a weight of 2.6 kg, and with sand - 3.4 kg, and if you fill it with additional water, it will be about 4 kg.
Such weights are suitable for training only for girls. Men should use larger plastic bottles. Today you can easily find plastic containers of 5, 6 and 10 liters. By filling them with various fillers you can get sports equipment weighing up to 40 kg. This load will be sufficient even for experienced athletes. But there is one problem: holding such a bottle is not very convenient, and its fastening is not designed for heavy weights. Therefore, it is better to make your own dumbbells with a comfortable handle.
To do this, you can use a regular towel or other long and thick fabric. The towel should be tied to form a circle. Then take it with your hand on one side and step on it on the other. inner part circle. Thus, when performing a biceps workout, you can adjust the level of load by pressing your foot on the towel.
For those who live in the countryside, there is one more piece of advice. Instead of dumbbells, you can use logs of various weights for training. The main thing is that the diameter of the log allows you to comfortably grasp it. But you can also drive metal brackets into the log, which will be convenient to hold on to during the exercise.
How to make dumbbells from plastic bottles?
You can easily make dumbbells from plastic bottles at home, since the bottles are easy to find or buy, and their cost is minimal. The main thing is to use heavy filler and securely fasten the elements.
To make a simple dumbbell, you only need 2 2-liter bottles, tape, a handle and filler.
Let's look at the detailed instructions for installing dumbbells from plastic bottles:

How can I replace a squat bar at home?
The weight of homemade dumbbells can be a maximum of 10 kg, so it is more rational to make a barbell, which is also used to train the biceps.
You need to have the same set of tools and raw materials, only instead of a handle you need to use a neck.

This type of sports equipment is perfect for performing squats and bench presses at home. The main thing is not to overload the bar, because homemade equipment may burst during exercise and cause serious injury.
Making dumbbells and barbells using concrete
To make heavier and more durable equipment, concrete should be used. But it can only be used with an all-metal neck, which should be prepared in advance.
 Pieces of metal pins need to be welded to the ends of the neck. The result is reinforced concrete, which is much stronger than usual. Another way to make the projectile more reliable is to add PVA glue to the solution.
The form for concrete weighting agents can be plastic buckets. By selecting a bucket of the required volume, you can obtain the desired weight of the finished rod. Containers for mayonnaise and other food products are suitable for dumbbells. The disadvantage of such equipment is that such a dumbbell is non-separable, that is, you will not be able to adjust the weight.
In order to make a barbell, you need to mix the solution and pour it into the mold. Set the bar strictly in the center; this is very important for balancing the projectile. Four days later, when the solution dries, the procedure should be repeated on the other side. If the concrete cannot be removed from the mold, it can be easily broken. If the bucket remains intact, it can be reused.
When calculating the weight of the finished rod, it is worth considering that 1 liter of poured concrete weighs about 2.5 kg. You can make a concrete weight in the same way.
DIY expander
Expander- A great tool for forearm training. Such equipment is cheap, but if you like to do everything yourself, you can easily make it yourself.
To do this you need to have steel wire with a diameter of 3 mm. Heating the wire using gas burner, it needs to be twisted in the form of a spring two turns. This can be done using a vice, pliers, a pipe around which the turns are formed, and brute force.
The finished spring must be both soft enough to yield to the efforts of one hand, but also hard enough to return to its original position.
The handles of the expander are made of wood, thick rubber and plastic, with holes drilled for the spring.
Attention, TODAY only!