A huge advantage of any type of creativity is that the created crafts turn out to be unique, thanks to your imagination. You can create flowers that do not exist in nature, or unprecedented animals according to your own vision. Today we will tell you how to make flowers from Thomas, which can decorate your home or serve as a wonderful gift for friends.


But before you start creating, you need to select the necessary materials for the work.
Materials
- foamiran of different colors (since the flower is a fantasy one, choose the colors at your discretion),
- iron,
- pastel pencils,
- ready-made stamens for flowers,
- floral wire,
- toothpick,
- hairspray,
- cardboard,
- paper.
The photo shows a ready-made set for creativity:

DIY foamiran flowers: progress of work
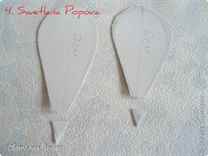
We begin making flowers from foamiran by creating blanks for the petals. To do this, we need to draw patterns on a sheet of cardboard:

Then we cut out the blanks and prepare them for work:

Now we need to transfer the contours of the petals onto sheets of foamiran. For this we need a toothpick.


Thanks to its pliable properties, we can easily cut out all the blanks using scissors.

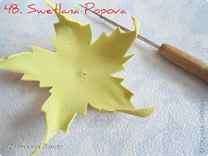
Using a small knife, remove a small amount of shavings from pastel pencils to tint leaves and flower petals:
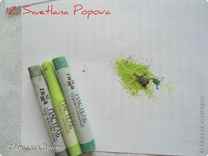
And carefully paint the base of each petal:

For the tops of the petals we use crayons of other colors:

And also carefully tint the edges:

When finished, our blanks look like this:

Using the example of the “peony from foamiran” master class, we have already discussed how to add volume and texture to blanks. So we do the same steps:
heat up:

add up:

twist:

We carry out these operations with all workpieces:

By the way, you can draw patterns of petals or other details yourself, thereby giving the flower the shape that you like.
And now we move on to the stamens of the flower.
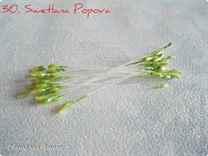
You can buy such blanks at any craft store. They are often used in ceramic (porcelain) floristry.
So, we bend 30 stamens in half and fix them with an elastic band or wire.

We wrap the blanks with a strip of foamiran fringe and align the edges of the stamens, thereby cutting off the place of fixation:
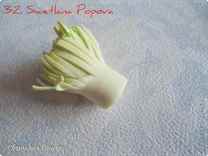

Wrap with a second layer of fringe:
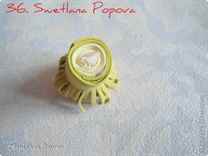
We have the core of the flower ready:

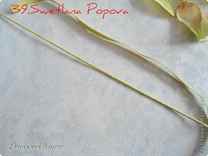
Now we need wire, which we will wrap with strips of foamiran in 2 layers:


We need to make a small knot at the end of the wire:

When all the details are ready. We begin gluing the petals. There is no special flower assembly scheme here. Since our model is fantasy, the shape and arrangement of the petals is left only to your discretion.


When all the petals are glued to the core, we attach the wire, smearing the knot at its end with glue:

We make a hole in the flower gluing and string it onto the wire, covering the junction with the core:
Glue using special glue:

The final touches to creating a flower are decorating the stem with petals:
The finished flower must be sprinkled with a small amount of hairspray to fix the color of pastel pencils on the petals: 
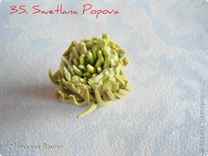
This is how the fantasy flower turned out:

If you have a rich imagination, then you, of course, can create a huge variety of all kinds of flowers that simply cannot be found in nature. I offer you the basic techniques for working with foamiran, taking as a basis those that will make it easier for you to realize your ideas.
Therefore, I offer you a few more video lessons on creating flowers from foamiran.
A selection of video lessons
Foamiran (FoamIran) is a soft sheet material in a palette of 20 or 24 colors (depending on the manufacturer), used in various types of needlework. The average sheet thickness is 1 mm. Foamiran is mainly made in China and Iran. Iranian is considered to be of higher quality, because... It was in Iran that the technique of making flowers from this amazing material originated. Foamiran can be painted and tinted with paints, patinas, and powders.
Foamiran is easy to shape using light heat (for example, applying to an iron or curling iron), twisting, stretching, processing with modeling tools, etc. After deformation, foamiran firmly retains its shape. That is why it is widely used for making topiary, flowers, jewelry (brooches, hairpins, elastic bands, headbands), dolls, and decorative elements for scrapbooking. Foamiran products are also used to decorate various premises (apartments, wedding and banquet halls, etc.). Flower brooches made of plastic suede do not wrinkle under outerwear, and this is a very valuable quality. Foamiran is an innovative material with endless potential for creativity, it is soft and silky to the touch. Its main feature is its ability to stretch slightly (up to 10%). This stretching is often enough for the material to take on and “remember” a new shape. This material is especially well shaped when exposed to the warmth of human hands (it does not get dirty or sticky). You can safely squeeze and twist the flexible suede, stretching it slightly. The material will easily take a new shape. However, excessive tension will cause the foamiran to rupture. The elasticity and relative strength of the material are due to the fact that foamiran contains ethylene and vinyl acetate. Plastic suede with a sheet thickness of about 1 mm is easily cut with scissors and cut out with shaped composters, as well as special cutting machines. Only specialized types of glue are suitable for working with plastic suede with strong fixation or a glue gun. Foamiran has a slightly porous structure, but at the same time has low water absorption. It is easy to clean, resistant to atmospheric influences and chemicals, non-toxic and harmless to the environment. The material is currently undergoing certification for the possibility of its use in children's creativity. You can also find it under the names: “Fom Eva”, “Foamiran”, “Foam” or “Foam”.
How to choose foamiran?
Most often, foamiran is made in Iran or China.Iranian EVA foam softer to the touch, thinner, with an uneven surface from 0.7 to 1.2 mm. The palette contains 22 natural colors. It is ideal for creating realistic flowers. Chinese foam is much denser and rougher, with a uniform surface. There are 25 different shades of colors in the palette. It is used in scrapbooking, to create dolls, jewelry and accessories.Master class
Lily
To make a flower we will need: - a sheet of green and white foamiran; - stamens; - acrylic paints; - cardboard; - felt-tip pen; - heat gun; - wire; - toothpick; - iron; - scissors. Manufacturing method: 1. Make a cardboard blank of a lily petal 6 cm, cut it out.2. Using this template, cut out 6 petals on a white shape.3. Tint them on both sides with pink-lilac color.4. To make the petals textured, heat them on an iron, drawing veins with a toothpick.5. Heat the edge of the petal too, giving it a waviness.6. Using a brown felt-tip pen, make several dots at the bottom of each petal, giving the flower a natural look.7. For the pistil and stamen, prepare 0.3 mm wire, stamens and small diamond-shaped pieces of plastic suede, painted black.8. Glue them to the wire.9. Before assembling the flower, cut out the leaves on green foam.10. Give the leaves texture by heating with an iron.11. Glue the first row of petals (3 pieces) around the glued stamens to the pistil.12. Glue the second row in a checkerboard pattern.13. Glue the leaves as you like at the bottom of the lily.
 Chamomile
The humble wildflower is recognized as a symbol of family, which is why “daisy” weddings with artificial daisies have become popular. We will tell you how to make these beautiful flowers from foamiran yourself at the master class. To create a flower we will need: - white foamiran; - cardboard; - oil pastel; - ruler; - glue; - pencil; - protractor. Manufacturing method: 1. Using a compass, draw the contours of 9 cm circles (3 pieces) on the foam and cut them out.2. Then cut a strip 2 cm wide and 27 cm long to create the middle, paint it yellow.3. Fold the strip in half, glue along the edge, cut the fringe from the fold side.4. Twist the core into a spiral, smearing it with glue.5. Cut out a 9cm cardboard circle, then use a protractor to mark the cuts for the petals.6. Use the resulting pattern to cut out white petals.7. Cut the petals, not reaching 2 mm from the core.8. Heat the tips of the petals with an iron, round them like a real chamomile.9. Place the blank in the middle and glue it.10. Do the same for 2 more rows of petals, fixing them with glue.
 Rose hip
1. Cut out a flower from pink foma using a template. 2. Using oil pastels, paint the rose hips.
  3. Give it shape.
  4. Cut a small hole in the center.
  5. To create a natural flower, we make stamens. For work we will need: glue, colored semolina, beads, yellow foil and threads.6. We cover the bead with yellow foamiran and secure it with threads.
  7. Apply glue and dip the bead in semolina.
  8. We wrap the stamens.
  9. We fasten everything with threads.
  10. Insert the prepared stamens into the middle of the flower (hole).
  11. For the splendor of the flower, add another flower blank.
  12. Cut out leaves and gluing from green fom.
  13. Use green acrylic paint and a sponge to tint the leaves.14. Connecting the parts.15. To fix the brooch-clip, cut out a small circle from the shape.16. Attach the brooch to the flower.
  Result
 The curious world has prepared for you a selection of products that contain flowers made from foamiran. Watch and be inspired!


 Video with master classes:
Sources:
Video with master classes:
Sources: Alstroemeria is a very unusual flower, which has recently been often used to make bouquets. These flowers have different colors, so they look good in almost any composition: with roses, with gerberas, with lilies, with chrysanthemums and even orchids. How to make alstroemeria from foamiran...
In the foamiran tutorial I will show you, using step-by-step photos, how to make a plumeria flower from foamiran with your own hands. From this flower you can make a miniature wedding bouquet for the bride; plumeria can also decorate any composition. Plumeria comes in different colors. I will make a white flower from foamiran with...
In this master class on foamiran, I will tell you how to make a flower called levkoy or mattiola from foamiran with your own hands. A sprig of this flower will decorate any wedding bouquet and any composition. Matthiola / gesso is well suited for making boutonnieres. This is an annual plant. The flowers are white,...
Foamiran crocuses are made quite rarely. They are mainly used to decorate flower arrangements, and then as an additional flower. I think crocus is undeservedly deprived of attention. Foamiran crocuses will look great on a spring-style hair clip, or…
Spring is coming and one of the first flowers to appear is the blooming mimosa. I propose to make such a small branch of mimosa from foamiran in this master class. To make mimosa flowers you will need the following materials: scraps of yellow foamiran; green Iranian foamiran;...
Marigolds are annual and perennial flowers. There are more than 60 varieties of marigolds. They come in a variety of colors from rich yellow to brown. Marigolds bloom all summer until late autumn, until frost. Marigolds have a specific smell that not everyone likes...
In this master class we will make white flowers from foamiran - these are crocuses. They are suitable for making interior bouquets, and they can also be used to decorate Easter compositions. To create white crocus flowers from marshmallow foamiran you will need: white,…
This is the kind of birch branch we make from marshmallow foamiran in this master class, which we will later use to create an Easter composition. For more information about foamiran crafts for Easter, see the following master classes. To create a birch branch from marshmallow foamiran you will need: green…
Palm Sunday is coming soon. I will show you one way to create a willow branch with your own hands, which I will use to decorate an Easter composition. Step-by-step master class: How to make a willow branch from foamiran with your own hands Let's start with a list of necessary materials. To create...
An unusual, complex at first glance, the Eryngium-Primorsky flower is actually quite simple to make. I will teach you this in this master class with the help of step-by-step photos and brief instructions for each of them. Making flowers from foamiran is a pleasure. You can create...
In this master class we will learn how to make beautiful flowers from foamiran, namely pink dahlia. Dahlia, one of the most autumn flowers. The variety of dahlias is very diverse. Yes, and we have already done more than one of the varieties with you. But in the fall you can make the following...
I propose to make this fern flower with me. The flower can be used to make boutonnieres, brooches and compositions. To create a fern flower you will need: orange, olive foamiran; wire No. 28-30, 1.2 mm; green phlox powder; second glue; camellia mold; boule with a diameter of up to...
If you look at a rudbeckia flower, you might think that it is a chamomile, only bright yellow. The rudbeckia flower has about 40 varieties. Almost all of them are unpretentious and take root well. Rudbeckia flowers, depending on the variety, have many shades of yellow and orange. Very…
Etlingera - popular name - Malayan rose. A very beautiful and unusual plant. The Malayan rose has leaves from one and a half to two and a half meters long and beautiful, porcelain-like, pink and white main inflorescences 30-50 cm tall. Picturesque inflorescences are preserved for a long time when cut,…
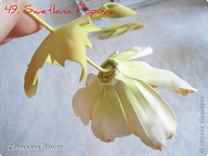
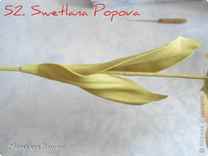
We have already made various types of orchids at the master class, used orchid flowers for decorations, today I suggest you make another type of miltonia orchid. We will make a miltonia orchid from marshmallow foamiran. To create a miltonia orchid from marshmallow foamiran you will need: white...
This is the kind of aster I suggest that beginning craftswomen make as their first flower. To create a needle aster you will need: Iranian yellow, white, pink, olive foamiran; green oil pastel and sponge; wire 1.2 mm; second glue; zigzag scissors; light green tape...
In nature, the dendrobium orchid exists in many varieties, with different colors. So I suggest you make two types of dendrobium orchids using two different patterns. These flowers can be used to decorate the interior, for compositions and decorations, hairpins and boutonnieres, etc. Here…
At the master class today I propose to make a branch of purple bells from Iranian foamiran. I suggest you make this branch of a bell from foamiran. This branch will decorate any bouquet of wildflowers. To create a branch of a purple bell from foamiran you will need: olive, white, yellow, purple...
Gloxinia, this indoor plant is a perennial. The stem of Gloxinia is short with large, succulent leaves in the shape of an oval and a juicy green color. The flowers are bell-shaped and quite large. The flowers have different colors, with different color transitions. Here is a gloxinia flower and buds...
Florists often use gypsophila flowers to decorate and complement bouquets. Today at the master class we will make such beautiful flowers. Here is a gypsophila made from foamiran. We will make flowers from a hole punch. To create gypsophila you will need: white, green foamiran; wire…
Hibiscus is a beautiful flower that can often be found on the sea coast in Turkey. This is a plant with very beautiful flowers, but, unfortunately, very short-lived. Hibiscus blooms for just a day. It is often grown as an indoor flower, because... he is quite unpretentious. IN…
Graduation days in kindergartens and schools are coming soon. Everyone is preparing for this holiday. In this master class, I will show you an idea for a graduation gift for a teacher or teacher that you can make with your own hands. To make it you will need silk foamiran, a little time and skill. IN…
We have already made an orange clematis flower from foamiran at one of the master classes. But today I offer you terry clematis, which will decorate any bouquet. The clematis flower has different shapes and different shades. Based on the size of the flowers, plants of this species are divided into small-flowered,…
Foamiran is a modern material that is pleasant to work with. For its excellent characteristics and ability to take any shape, it was nicknamed “rubber paper.” The color palette of foamiran is impressive, and working with it is a pleasure!
Foamiran flowers are distinguished by their realism and absolute similarity to the original plants. Such products are used everywhere: in the interior, for handicrafts, for bright holiday decorations, for creating clothes and jewelry.
Foamiran is an artificial fabric with a structure reminiscent of suede or rubber. It is this feature that allows the products to be as natural and beautiful as possible.
Foamiran in assortment
Making flowers from foamiran yourself is not difficult; it requires standard tools, a diagram and desire.
Fantasy will make your product perfect and unique. Large flowers are the most spectacular and lightest, since they do not require long, painstaking work.
Necessary materials to create a large flower:
- foamiran (three sheets: green, white, pink)
- scissors
- toothpicks
- iron (for shaping)
- chalk pastels
- hot melt adhesive

 pattern for a rose from foamiran
 In principle, the number of petals is not limited, but you must clearly focus on the appearance of your flower so that it is as natural and beautiful as possible.
The petals in this flower are of different sizes. To start attaching to the green base, you need to start with small ones (the middle) and gradually expand towards the edge.
Creating beautiful petals from foamiran:
- draw or print petal templates on a printer
- Place the templates on the material and trace the outlines with a toothpick
- carefully cut the petals from the material with scissors
- heat the iron to medium heat
- place the petal on the iron for a few seconds, this will curl it a little into its natural shape
- You can use a toothpick to draw veins on the petal for naturalness.
- use a fine pink pastel (darker than the material) to rub the edges of the petal to give it volume and brightness
- Attach with hot glue to the cut out base of a green flower
Video: “Foamiran flower”
How to make small flowers from foamiran: diagrams
Small flowers made from foamiran are an excellent product for creating decorative elements, head decorations and even jewelry. Creating flowers does not take much time due to the fact that they are small and do not require heat treatment.
 small roses from foamiran
 Necessary tools for making small roses:
- colored foamiran
- wire
- scissors
- hot glue
Usually, a pattern is not required to make such roses. All petals in a flower are the same size and are cut together.
If you want to make other petals, of a different shape and size, use the template:

 flower petals template made from foamiran
 Making a flower:
- Measure three centimeters on the folded roll of material
- cut a strip of three centimeters
- fold the cut foamiran tape like an accordion several times to the size of two and a half centimeters
- cut the sides of the accordion to get uniform square pieces
- Cut a drop from each square, cutting off the corners evenly
- Attach the petals to the wire one by one using hot glue
- at the end, cut out a green star and glue it to the base of the bud
Video: “Master class on a little rose from foamiran”
DIY flower patterns from foamiran
Just as flowers are varied in the natural environment, they are also varied when made from foamiran. There are many sketches that allow you to create not only roses, but also lilies, crocuses, tulips, poppies and much more.

 basket of flowers made of foamiran
 An orchid made from this particular material turns out to be incredibly beautiful, delicate and feminine. This flower does not require a large number of petals, but it needs to be made as natural as possible by painting with acrylic paints. The petal pattern is the simplest. It can be cut to any size.

 Orchid petals template
 Diligence, hard work and the desire to replicate a living flower as much as possible will help you create a real work of handicraft art. The veins on the petal can be made with a special stamp, or they can be done by gently pressing a toothpick.

 white orchid from foamiran
 It is easy and simple to create a lily from foamiran, because it is a fairly simple large flower. To do this, you will need to use a template of petals that follow the curves of a real plant:

 lily petals pattern
 The core of the lily can be purchased ready-made along with the material itself. Applying it to a not too hot iron will help make the petals look natural.
The material bends and takes any shape you give it. It will be necessary to make several veins with a toothpick and make colored dots with bright acrylic paints.
Video: “Orchid from foamiran, master class”
How to make wildflowers from foamiran: master class
Wildflowers are the favorites of many women. They become a wonderful decoration if they are made of high-quality foamiran. Such compositions can easily be made on decorative headbands and hair clips, create frames and decorate your home with them.
 composition of wildflowers made of foamiran
 If you start listing the variety of names, you won’t have enough fingers on both hands. There are so many of them that your eyes are dizzying. When making flowers from material, you must strictly follow the templates so that the work turns out to be as similar as possible to the original.
Wildflowers are not large and therefore their implementation is painstaking, detailed work. It requires clear detailing, complementing flowers with stamens, leaves, buds and stems.
One popular one is the "pansy", a bright purple-yellow flower:

 Pansy flower diagram
 Among other spectacular wildflowers, we can highlight cornflower, which will dilute any composition and become a contrasting element. Blue cornflower goes well with chamomile, sunflowers and even dandelions.

 pattern diagram "cornflower"
 Remember that wildflowers always harmonize perfectly with the greenery of the grass, so do not forget to dilute the flower arrangement with leaves, stems and spikelets.
Video: “Wildflowers from foamiran”
Foamiran flowers - orchid: diagrams
Phalaenopsis is one of the most popular and beautiful types of orchids. Phalaenopsis made from foamiran are incredibly beautiful.
- It is very simple to perform, since the flower essentially consists of only three petals
- Each petal should be heated with an iron to give it a natural shape and slightly darken the edges with pastel
- Contrasting edges and small dotted dots with acrylic paint will help make the flower original and naturally beautiful.
- The color of the flower should be exactly repeated and then it will be impossible to distinguish it from the original

 Diagram of phalaenopsis orchid petals
 Video: “Do-it-yourself foamiran orchids”
Foamiran flowers - peony: diagrams
A peony flower made from this material is as natural as possible due to the fact that many petals are used to create it and they are very lush.
To make the petals beautiful and original, pastel applied to the edge of each petal and giving it a cut edge with scissors will help.

 ready-made peony from material
 This material is so flexible that as you crumple it, it will take the desired shape.

 Peony petal cutting diagram
 Video: “How to make a peony from foamiran?”
Foamiran flowers - chamomile: diagrams
Chamomile is the simplest flower and making it from material does not require any special templates; the only condition that needs to be met is to use a template so that the flowers are the same in size.

 flower and leaf template
 The chamomile is made from white foamiran, and its core can be made from half a yellow bead. Chamomiles are good for decorative finishing and creating hair decorations.
Video: “Foamiran flowers, daisies”
Cherry flowers from foamiran: diagrams
Cherry flowers are very simple and easy to cut yourself from material. You should choose a pale pink color and decorate the core of the flower with stamens. Cherry flowers are larger than field chamomile and their petals are much wider.

 cherry blossom pattern
 It is advisable to heat the petals on an iron so that they take on a twisted, wavy shape and darken their tips with pastels.
Video: “Headband with sakura flowers from foamiran”
What can be made from foamiran flowers: compositions
Compositions made from foamiran will perfectly decorate any interior and add richness, romance and joy to the room.
Such flowers are good because they do not require care or watering, and always look fresh and natural. You can safely experiment with decorative ones:
- vases
- baskets
- paintings
- within
- wall decorations
- wreaths
 bouquet - interior decoration
 Handmade work is always highly valued and therefore rest assured that such decoration will become an asset to your room. There are many variations of jewelry and each element is individual.
Foamiran bouquets are often used at weddings and to decorate tables at special events. They always attract attention and often become indistinguishable from real flowers.
Video: “Foamiran. The principle of creating a composition of flowers in a basket"
Foamiran topiary: what is it?
Topiary has long become a favorite decorative element of any interior. It perfectly dilutes boring furniture and attracts attention.
Topiary is made from any decoration and foamiran is no exception. With its help, you can create elastic, beautiful flowers that are easy to attach and look great, creating volume and delighting with rich colors.

 topiary
 A topiary is a flower pot with a tree growing from it. It symbolizes family wealth and business prosperity. Therefore, topiary is a necessary thing in every home.
Video: “Topiary - the tree of happiness”